Hi guys!! Here we open the
Android tutorial series with Login Screen tutorials.
Tuts Approach: Initially
we will start learning Android UI creation and implementing small logic on them
or you can say various events on widgets(like- OnClick, OnTouch etc.)
Requirement: A login screen which will accept a valid username
and password
Implementation:
- Select
Eclipse->File->New->Android Project, in the dialog, fill the fields, Project
Name (ex: LoginExample), Build Target (to compile the application by a
particular Android SDK), Application Name (name of application, ex:
LoginExample), Package Name (ex: com.deepak.login), Create Activity (ex:
LoginActivity)
- Click
on Next->Finish. An android project folder with name ‘LoginExample’ will get
built in the left pane (Project Explorer) of Eclipse.
- On exploring the Project folder, you will be able
to see the sub folders /src, /gen, /res & AndroidManifest.xml
Note:
The above steps are for project creation which will not be mentioned in the each
post. Please learn and practice them.
Creating Layout: After the deciding the screen design by some doing
paper work or on paint file, we should create the layout first. Here, in our
case, I am not showing any raw paper work or paint file for screen design. Once
you will go through this layout till the end, you will get the idea for screen
designing.
Source
code:
In
res/values folder in the project in your eclipse, edit strings.xml file
<?xml version="1.0"
encoding="utf-8"?>
<resources>
<string name="hello">Hello World, LoginActivity!</string>
<string name="app_name">LoginExample</string>
<string name="login_title">Login Screen</string>
<string name="username">Username</string>
<string name="password">Password</string>
<string name="login">Login</string>
</resources>
In the string.xml file, we should declare all Strings which are going to use in the screen, so that we need not to hard code them in the Java code.
Place the login.xml file
in res/layout/ folder in the project in your eclipse
Layout File : login.xml
<?xml version="1.0"
encoding="utf-8"?>
<LinearLayout xmlns:android="http://schemas.android.com/apk/res/android"
android:layout_width="fill_parent"
android:layout_height="fill_parent"
android:orientation="vertical"
>
<!-- Login Title -->
<TextView
android:layout_width="fill_parent"
android:layout_height="wrap_content"
android:text="@string/login_title"
android:gravity="center_horizontal"
android:textSize="20dp"
/>
<!-- Login Image -->
<ImageView
android:layout_width="fill_parent"
android:layout_height="0dp"
android:gravity="center_horizontal"
android:src="@drawable/ic_launcher"
android:layout_weight="1.1"
android:padding="20dp"
/>
<!-- layout for Username -->
<LinearLayout
android:layout_width="fill_parent"
android:layout_height="wrap_content"
android:orientation="horizontal"
android:layout_weight="0.01"
android:padding="10dp">
<TextView
android:layout_height="wrap_content"
android:layout_width="0dp"
android:layout_weight="1.0"
android:text="@string/username"
android:textSize="18dp"
/>
<EditText
android:id="@+id/username"
android:layout_width="0dp"
android:layout_height="wrap_content"
android:layout_weight="1.0"
android:ems="10"
android:inputType="text"
>
<requestFocus />
</EditText>
</LinearLayout>
<!-- layout for Password -->
<LinearLayout
android:layout_width="fill_parent"
android:layout_height="wrap_content"
android:orientation="horizontal"
android:layout_weight="0.01"
android:padding="10dp"
>
<TextView
android:layout_height="wrap_content"
android:layout_width="0dp"
android:layout_weight="1.0"
android:text="@string/password"
android:textSize="18dp"
/>
<EditText
android:id="@+id/password"
android:layout_height="wrap_content"
android:layout_width="0dp"
android:layout_weight="1.0"
android:inputType="textPassword"
/>
</LinearLayout>
<Button
android:id="@+id/login"
android:layout_width="match_parent"
android:layout_height="wrap_content"
android:text="@string/login"
android:layout_margin="10dp"
/>
</LinearLayout>
In the above layout, the
widgets which we have used are TextView (Title Label for the screen), ImageView
(Image for the Screen), Linear layout (for username TextView i.e. label and
EditText i.e. textbox), another Linear Layout (for password TextView i.e. label
and EditText i.e. textbox) and a button (for Login).
We have written the
properties to each of these widgets like-id, width, height, text, textsize,
padding, margin etc.
For more in-depth
knowledge on UI elements: Follow this links
Writing Activity
Class: Now, we gotta write
Activity class which will contain the business logic. In Activity class, we
will bind the UI elements (which we have written in the layout xml file) in the
form of Java Class objects and perform action/events like getting inputs from
user, performing operation on the data and responding or doing action based on
that.
Edit the file from
src/com.deepak.login/LoginActivity.java from your Eclipse
Source code:
LoginActivity.java
package
com.deepak.login;
import
android.app.Activity;
import
android.os.Bundle;
import
android.view.View;
import
android.view.View.OnClickListener;
import
android.widget.Button;
import
android.widget.EditText;
import
android.widget.Toast;
public class LoginActivity extends Activity {
String userName, passWord;
EditText username, password;
Button login;
/** Called when the activity is first
created. */
@Override
public void onCreate(Bundle
savedInstanceState) {
super.onCreate(savedInstanceState);
setContentView(R.layout.login);
// UI elements gets bind in form of
Java Objects
username = (EditText)findViewById(R.id.username);
password = (EditText)findViewById(R.id.password);
login = (Button)findViewById(R.id.login);
// now we have got the handle over the
UI widgets
// setting listener on Login Button
// i.e. OnClick Event
login.setOnClickListener(loginListener);
}
private OnClickListener
loginListener = new
OnClickListener() {
public void onClick(View v)
{
//getting inputs from user and performing data operations
if(username.getText().toString().equals("deepak") &&
password.getText().toString().equals("garg")){
// responding to the User inputs
Toast.makeText(getApplicationContext(),
"Login
Successfully !!!", Toast.LENGTH_LONG).show();
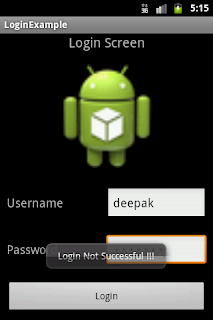
}else
Toast.makeText(getApplicationContext(),
"Login
Not Successful !!!", Toast.LENGTH_LONG).show();
}
};
}
Output:
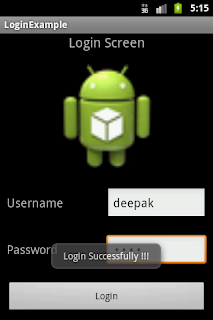
Congs
for creating the first screen on android, the login screen. Guys! This tutorial
gives you the basic look on android development.
Android recommends the Login Design in a different way:
The
above design is the typical Login screen design which we see on all desktop
applications or even on some mobile apps. Now, we will implement the login
design what Android recommends. We can make some changes in the earlier design
to reach to the new one; the new one is more specific to mobile screens.
Create
a new layout xml file the login_android.xml file in res/layout/ folder in the
project in your eclipse
Source
code: login_android.xml
<?xml version="1.0"
encoding="utf-8"?>
<LinearLayout xmlns:android="http://schemas.android.com/apk/res/android"
android:layout_width="fill_parent"
android:layout_height="fill_parent"
android:orientation="vertical"
>
<!-- Login Title -->
<TextView
android:layout_width="fill_parent"
android:layout_height="wrap_content"
android:text="@string/login_title"
android:gravity="center_horizontal"
android:textSize="20dp"
/>
<!-- Login Image -->
<ImageView
android:layout_width="fill_parent"
android:layout_height="0dp"
android:gravity="center_horizontal"
android:src="@drawable/ic_launcher"
android:layout_weight="1.1"
android:padding="20dp"
/>
<!-- layout for Username -->
<LinearLayout
android:layout_width="fill_parent"
android:layout_height="wrap_content"
android:orientation="horizontal"
android:layout_weight="0.01"
android:padding="10dp">
<EditText
android:id="@+id/username"
android:layout_width="0dp"
android:layout_height="wrap_content"
android:layout_weight="1.0"
android:ems="10"
android:inputType="text"
android:hint="@string/username"
>
<requestFocus />
</EditText>
</LinearLayout>
<!-- layout for Password -->
<LinearLayout
android:layout_width="fill_parent"
android:layout_height="wrap_content"
android:orientation="horizontal"
android:layout_weight="0.01"
android:padding="10dp"
>
<EditText
android:id="@+id/password"
android:layout_height="wrap_content"
android:layout_width="0dp"
android:layout_weight="1.0"
android:inputType="textPassword"
android:hint="@string/password"
/>
</LinearLayout>
<Button
android:id="@+id/login"
android:layout_width="match_parent"
android:layout_height="wrap_content"
android:text="@string/login"
android:layout_margin="10dp"
/>
</LinearLayout>
Activity:
Now we just need to
set this layout file instead of the earlier one, so a small change in Activity
class.
In
the onCreate() function
setContentView(R.layout.login_android);
Output:
In
the output screen, We have removed the Labels for username and password,
instead of this, we have provided hints with in the respective fields and even
user can type long username or password.
Please
post your feedbacks/challenges J


