Thursday, May 3, 2012

Tutorial 2: Understanding Android Layouts


In Android, there are various types of layouts available which are used to design the screen or we can say, are used to arrange the order of various widgets(like- TextView, EditText, Button, Image, ImageButton etc.) in the required manner. In Android terms, the layouts are called as ViewGroups and widgets are called as Views.

The wise use of different layouts in the screen can reduce the development time and effort and even can save you from the later stage issues (like- inserting more widgets in the screen in later stage, porting to different screen resolutions, we will discuss it in the upcoming posts).

So, Lets start understanding the behavior of different layouts:

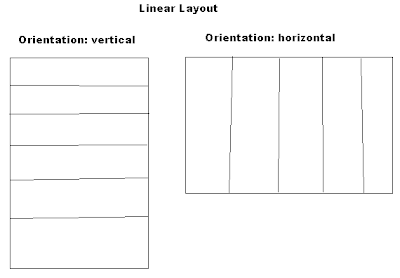
Linear Layout: Linear layout arranges all the children widgets in one direction like- vertical or horizontal as shown in the image.
So, where ever we want some widgets to be aligned in a single direction, we can make use of Linear Layout.


Remember that designing the android screen goes from top to down fashion.


Android has given three amazing properties- wrap_content, match_parent, fill_parent to declare the height and width of the layouts and widgets. The one should make use of them very wisely. Never practice declaring the absolute height and width of any view. The best way is to use property wrap_content maximally.

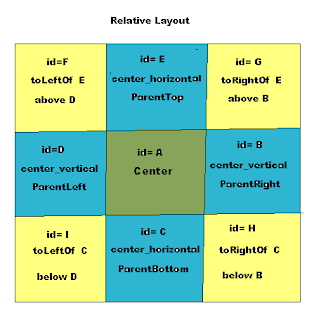
Relative Layout: Relative layout arranges the children widgets relative to the parent layout or relative to each other. Best way to understand it, look at the image.
Table Layout: Table layout arranges the children widgets in the table, i.e. rows and columns, look at the image.
Frame Layout: Frame layout arranges the children widgets relative to top left point. In this way, the widgets may get overlapped as shown in the image.
Absolute Layout: Absolute layout pins the children widgets in the coordinate points as shown in the image.
However, this layout is advised not to practice as it raises the issues while designing the same layout for different screen resolutions. Even it has been deprecated in the latest versions of Android.

Please post your feedbacks/challenges J


Wednesday, May 2, 2012

Tutorial 1: Login Screen


Hi guys!! Here we open the Android tutorial series with Login Screen tutorials.
Tuts Approach: Initially we will start learning Android UI creation and implementing small logic on them or you can say various events on widgets(like- OnClick, OnTouch etc.)

Requirement: A login screen which will accept a valid username and password

Implementation:

  • Select Eclipse->File->New->Android Project, in the dialog, fill the fields, Project Name (ex: LoginExample), Build Target (to compile the application by a particular Android SDK), Application Name (name of application, ex: LoginExample), Package Name (ex: com.deepak.login), Create Activity (ex: LoginActivity)
  • Click on Next->Finish. An android project folder with name ‘LoginExample’ will get built in the left pane (Project Explorer) of Eclipse.
  • On exploring the Project folder, you will be able to see the sub folders /src, /gen, /res & AndroidManifest.xml 
Note: The above steps are for project creation which will not be mentioned in the each post. Please learn and practice them.

Creating Layout: After the deciding the screen design by some doing paper work or on paint file, we should create the layout first. Here, in our case, I am not showing any raw paper work or paint file for screen design. Once you will go through this layout till the end, you will get the idea for screen designing.


Source code:
In res/values folder in the project in your eclipse, edit strings.xml file

<?xml version="1.0" encoding="utf-8"?>
<resources>

    <string name="hello">Hello World, LoginActivity!</string>
    <string name="app_name">LoginExample</string>
      <string name="login_title">Login Screen</string>
      <string name="username">Username</string>
      <string name="password">Password</string>
      <string name="login">Login</string>
</resources>


In the string.xml file, we should declare all Strings which are going to use in the screen, so that we need not to hard code them in the Java code.

Place the login.xml file in res/layout/ folder in the project in your eclipse
Layout File : login.xml

<?xml version="1.0" encoding="utf-8"?>
<LinearLayout xmlns:android="http://schemas.android.com/apk/res/android"
    android:layout_width="fill_parent"
    android:layout_height="fill_parent"
    android:orientation="vertical" >
      <!-- Login Title -->
    <TextView
        android:layout_width="fill_parent"
        android:layout_height="wrap_content"
        android:text="@string/login_title"
        android:gravity="center_horizontal"
        android:textSize="20dp" 
        />
    <!-- Login Image -->
    <ImageView
        android:layout_width="fill_parent"
        android:layout_height="0dp"
        android:gravity="center_horizontal"
        android:src="@drawable/ic_launcher"
        android:layout_weight="1.1"
        android:padding="20dp"
        />
    <!-- layout for Username -->
    <LinearLayout
            android:layout_width="fill_parent"
      android:layout_height="wrap_content"
      android:orientation="horizontal"
      android:layout_weight="0.01"
      android:padding="10dp">
     
        <TextView
            android:layout_height="wrap_content"
            android:layout_width="0dp"
            android:layout_weight="1.0"
            android:text="@string/username"
            android:textSize="18dp"
            />
        <EditText
            android:id="@+id/username"
            android:layout_width="0dp"
            android:layout_height="wrap_content"
            android:layout_weight="1.0"
            android:ems="10"
            android:inputType="text" >

            <requestFocus />
        </EditText>

    </LinearLayout>
    <!-- layout for Password -->
    <LinearLayout
            android:layout_width="fill_parent"
      android:layout_height="wrap_content"
      android:orientation="horizontal"
      android:layout_weight="0.01"
      android:padding="10dp"
      >
        <TextView
            android:layout_height="wrap_content"
            android:layout_width="0dp"
            android:layout_weight="1.0"
            android:text="@string/password"
            android:textSize="18dp"
            />
        <EditText
            android:id="@+id/password"
            android:layout_height="wrap_content"
            android:layout_width="0dp"
            android:layout_weight="1.0"
            android:inputType="textPassword"
            />
    </LinearLayout>
    <Button
        android:id="@+id/login"
        android:layout_width="match_parent"
        android:layout_height="wrap_content"
        android:text="@string/login"
        android:layout_margin="10dp"
        />
</LinearLayout>


In the above layout, the widgets which we have used are TextView (Title Label for the screen), ImageView (Image for the Screen), Linear layout (for username TextView i.e. label and EditText i.e. textbox), another Linear Layout (for password TextView i.e. label and EditText i.e. textbox) and a button (for Login).
We have written the properties to each of these widgets like-id, width, height, text, textsize, padding, margin etc.

For more in-depth knowledge on UI elements: Follow this links

Writing Activity Class: Now, we gotta write Activity class which will contain the business logic. In Activity class, we will bind the UI elements (which we have written in the layout xml file) in the form of Java Class objects and perform action/events like getting inputs from user, performing operation on the data and responding or doing action based on that.

Edit the file from src/com.deepak.login/LoginActivity.java from your Eclipse
Source code: LoginActivity.java

package com.deepak.login;
import android.app.Activity;
import android.os.Bundle;
import android.view.View;
import android.view.View.OnClickListener;
import android.widget.Button;
import android.widget.EditText;
import android.widget.Toast;
public class LoginActivity extends Activity {
      String userName, passWord;
      EditText username, password;
      Button login;    
    /** Called when the activity is first created. */
    @Override
    public void onCreate(Bundle savedInstanceState) {
        super.onCreate(savedInstanceState);
        setContentView(R.layout.login);
        // UI elements gets bind in form of Java Objects
        username = (EditText)findViewById(R.id.username);
        password = (EditText)findViewById(R.id.password);
        login = (Button)findViewById(R.id.login);
        // now we have got the handle over the UI widgets
        // setting listener on Login Button
        // i.e. OnClick Event
        login.setOnClickListener(loginListener);  
    }
    private OnClickListener loginListener = new OnClickListener() {
      public void onClick(View v) {
//getting inputs from user and performing data operations
                   
            if(username.getText().toString().equals("deepak") &&
                        password.getText().toString().equals("garg")){
// responding to the User inputs
                  Toast.makeText(getApplicationContext(), "Login Successfully !!!", Toast.LENGTH_LONG).show();      
            }else
                  Toast.makeText(getApplicationContext(), "Login Not Successful !!!", Toast.LENGTH_LONG).show();                           
      }
    };
}

Output: 
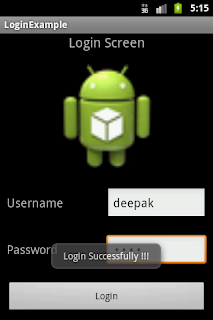


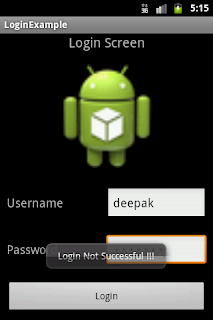
Congs for creating the first screen on android, the login screen. Guys! This tutorial gives you the basic look on android development.


Android recommends the Login Design in a different way:

The above design is the typical Login screen design which we see on all desktop applications or even on some mobile apps. Now, we will implement the login design what Android recommends. We can make some changes in the earlier design to reach to the new one; the new one is more specific to mobile screens.

Create a new layout xml file the login_android.xml file in res/layout/ folder in the project in your eclipse

Source code: login_android.xml

<?xml version="1.0" encoding="utf-8"?>
<LinearLayout xmlns:android="http://schemas.android.com/apk/res/android"
    android:layout_width="fill_parent"
    android:layout_height="fill_parent"
    android:orientation="vertical" >
      <!-- Login Title -->
    <TextView
        android:layout_width="fill_parent"
        android:layout_height="wrap_content"
        android:text="@string/login_title"
        android:gravity="center_horizontal"
        android:textSize="20dp" 
        />
    <!-- Login Image -->
    <ImageView
        android:layout_width="fill_parent"
        android:layout_height="0dp"
        android:gravity="center_horizontal"
        android:src="@drawable/ic_launcher"
        android:layout_weight="1.1"
        android:padding="20dp"
        />
    <!-- layout for Username -->
    <LinearLayout
            android:layout_width="fill_parent"
      android:layout_height="wrap_content"
      android:orientation="horizontal"
      android:layout_weight="0.01"
      android:padding="10dp">
        <EditText
            android:id="@+id/username"
            android:layout_width="0dp"
            android:layout_height="wrap_content"
            android:layout_weight="1.0"
            android:ems="10"
            android:inputType="text"
            android:hint="@string/username"
            >
            <requestFocus />
        </EditText>
    </LinearLayout>
    <!-- layout for Password -->
    <LinearLayout
            android:layout_width="fill_parent"
      android:layout_height="wrap_content"
      android:orientation="horizontal"
      android:layout_weight="0.01"
      android:padding="10dp"
     
      >
        <EditText
            android:id="@+id/password"
            android:layout_height="wrap_content"
            android:layout_width="0dp"
            android:layout_weight="1.0"
            android:inputType="textPassword"
            android:hint="@string/password"
            />
    </LinearLayout>
    <Button
        android:id="@+id/login"
        android:layout_width="match_parent"
        android:layout_height="wrap_content"
        android:text="@string/login"
        android:layout_margin="10dp"
        />
</LinearLayout>

Activity: Now we just need to set this layout file instead of the earlier one, so a small change in Activity class.

In the onCreate() function
setContentView(R.layout.login_android);

Output: 


In the output screen, We have removed the Labels for username and password, instead of this, we have provided hints with in the respective fields and even user can type long username or password.

Please post your feedbacks/challenges J

Tuesday, April 10, 2012

Starting Android Tutorial Series

Hello Folks!! Apologies for being off from blogging for a while!

Well, the news is, soon i am gonna start an Android Tutorial Series on my blog where new Android developers can learn the android development step by step very easily. This series will help you to learn the android from scratch work to the application building.

We will start this series with the exercises on creating different mobile User Interfaces.

And for the experienced developers, I will keep posting my new research topics and implementation of android new features.

Please post your suggestions even if those are the silly ones. Really looking forward to yours comments, even i need great motivation to get this work done. :)


Wednesday, February 8, 2012

Creating Android Phone Tablet application in a single apk

Guys!! It was very difficult to believe that Android had introduced an entirely new API (Fragment API) for Tablet App Development. Coming from Activity background, it was really tough to digest this fragments concept while coding; even if it is very interesting and more generalized one. Soon, i got to hear that we can create a single apk file for both phone and Tablets by using Fragment API itself. On digging more into it, it became quite easy and interesting to implement.

Functional Concept

Basically, in such type of apps, we need to separate all components of our application, and then convert each component to fragments. For example- Dashboard Fragment for Dashboard screen, two fragments for List and Details. Then, as our need, we can combine them to fit on the screens of both phone and tablet based on the Space available and required functionality.

Technical Concept

The earlier concept (for mobile versions) was to have activity class for each screen having business logic written for the respective screen functionality. Here we will write the business logic once but only different main screen layouts for both phone and tablet screens. Now, we will have smaller components as Fragment classes & layouts and their respective business logic in them.
As we know, we cannot show fragment directly on screen as it needs to be in the form of Activity class.  So for phone, we will convert the fragment to FragmentActivity class and for tablet we will have separate layouts containing two or more fragments and their respective FragmentActivity classes.
Now, on deploying the same apk file to both phone and tablet, it should take respective layouts for both.

Sample Application

So here is what i have created a way or you can say a ‘BASE STRUCTURE’ for any Phone-Tablet Android Application.
Application Name: TestPhoneTablet
Deployment platforms: Phone and Tablet versions both, i.e. Android 2.x & 3.x
External Jar file: android-support-v4.jar (When we need to deploy our application on both phone and tablet, all Fragment and Fragment Activity classes in our project should extend from this jar).

Description: In the application for phone, a list of countries will be displayed on first screen; on clicking any of them, the country name will be displayed on the second screen.
On the other hand in case of Tablet, on a single screen, the list of countries will be displayed on left hand side and on clicking any of them; the country name will be displayed on right side.
Brief Description for every element (classes and xmls) in the above project:
·         com.deepak.test : This package is for all the classes which will be common elements for both phone and tablet build.
§  BaseActivity.java: This class extended by FragmentActivity class is the base class for our whole project. A base activity that defers common functionality across app activities to an ActivityHelper. This class shouldn't be used directly; instead, activities should inherit from BaseSinglePaneActivity or BaseMultiPaneActivity.
§  BaseMultiPaneActivity.java: This class extended by BaseActivity class and all Tablet activities will extend to this class. It can contain multiple panes, and has the ability to substitute fragments for activities when intents are fired using BaseActivity#openActivityOrFragment(android.content.Intent).
§  BaseSinglePaneActivity.java: This class extended by BaseActivity class and all Phone activities will extend to this class. It simply contains a single fragment. The intent used to invoke this activity is forwarded to the fragment as arguments during fragment instantiation.
§  Home Activity.java: This Activity class is the launcher activity for our application and is only class which directly extends to the BaseActivity class after BaseSinglePaneActivity and BaseMultiPaneActivity classes. It sets the layout activity_home.xml on screen which is defined for both phone and tablet in their respective layout folders.
§  List_Fragment.java: This is List Fragment class, containing a list of countries which is the first screen of our application.
§  DetailFragment.java: This is a Fragment class which shows the selected country name.
·         com.deepak.test.phone : The package for all phone activity classes.
§  DetailActivity.java: The FragmentActivity class on converting the DetailFragment class to an activity and used to show only on Phone.
·         com.deepak.test.tablet : The package for all tablet activity classes.
·         com.deepak.test.Utils : The package for utility/helper classes in our project.
§  ActivityHelper.java: A class that handles some common activity-related functionality in the app, such as setting up the action bar. This class provides functionality useful for both phones and tablets, and does not require any Android 3.0-specific features.
§  ActivityHelperHoneycomb.java: An extension of ActivityHelper that provides Android 3.0-specific functionality for Honeycomb tablets. It thus requires API level 11.
§  SimpleMenu.java: An implementation of Menu Interface to show the action bar and Options menu in tablet and phone respectively.
§  SimpleMenuItem.java: An implementation of MenuItem interface.
§  UIUtils.java: A utility class which can have many UI helper functions like- to know the version of device OS on which the app is deployed so that it could render respective activities and layouts.
·         res/layout: The layout files used for Fragments and Phone screens or we can say that common layout files for phone and tablets.
·         res/layout-xlarge-v11: the layout files for tablet screens.
If we want to make the same layout look different on both phone and tablet, we can put the same layout with same name and different design in both layout folders. On  deployment, we will automatically render to the respective folder. Similary for  drawable & drawable-xlarge-v11 and menu & menu-xlarge-v11 folders

App Screenshots:

Tablet Screen
Phone Screen:
Here is link for source code. Enjoy doing some creative stuff and meeting your requirements.
http://code.google.com/p/testphonetablet-androidapp/downloads/list

Folks!! This is all about the project structure and files for this particular requirement. Please provide your comments, ques and suggestions J